

If you want to start taking incredible photos of the night sky, I highly recommend investing in a small star tracker. You can attach your existing camera and lens to a star tracker to take amazing photos of large nebulae and galaxies.
Over the years, I have used many different star trackers, but the Sky-Watcher Star Adventurer 2i is the model I reach for most. This model is very lightweight and perfect for spur-of-the-moment sessions on the road.
The key to this device is its precise tracking capabilities, which match the apparent rotation of the sky. The tracking freezes deep space objects like galaxies and nebulae in place, so you can take long exposure pictures (up to 2-3 minutes) without star trailing.
If you’re unsure about setting up a star tracker for astrophotography, use the video or the guide below to help you. If you’re unsure of which star tracker to use, see our in-depth star tracker guide.
The Kit Used in This Article:

All of the images in the graphic below were captured using my DSLR camera and lens on a star tracker. I even brought this setup with me to Australia last summer to capture the Carina Nebula (top right).
Head to The Darkest Skies Possible
When planning a night of astrophotography, driving out to a dark sky location, away from city lights, is ideal. For this project, I drove exactly an hour away from my home (to the minute!). You can read more about how to find dark skies for these types of projects here.
Dark skies are crucial for astrophotography, especially when capturing wide-field shots through a camera lens. The darker the sky, the more stars and faint nebulae you’ll be able to reveal in your images, and the more contrast you’ll see in the images.
If you’re setting up in your backyard, a star tracker is still effective, but keep in mind that light pollution will reduce the number of visible stars, making it harder to locate and frame your target.

My dark sky location for a night of astrophotography (Bortle 4).
A big advantage of using a star tracker setup is that it’s portable and battery-powered, allowing you to set up almost anywhere. Most models run on AA batteries and can last the entire night.
Consider using a lightweight carbon fiber tripod that extends to a comfortable height for your mount. If possible, choose one that includes a center hook to hang a weight from it for extra stability. This type of stability is especially important for long exposures.
The one I use (Radian branded) is no longer made, but the model shown below is a suitable replacement. It includes the mounting head style needed for a solid star tracker base, and a hook to add additional weight for stability.
![]()
![]()
Recommended tripod to mount a star tracker. (ARTCISE CT80C on Amazon).
Time of Year, and The New Moon
Something else to consider is the time of year and the moon phase. For deep space photography, you’ll want to set up on a moonless night for maximum contrast of the subject. Unfortunately, these precious days surrounding the new moon are often cloudy, so get as close as you can.
You can use an astronomy app like Stellarium to preview the night sky and help you find and frame your targets. It will also show you when deep-sky targets will rise so you can plan how long you have to image.
With summer around the corner, the Milky Way core rises earlier each night. It’s a really exciting time for astrophotographers. If you’re looking to capture the Milky Way with your camera and star tracker, be sure to see our complete Milky Way Photography Guide.

The Milky Way Core capture using a DSLR on a star tracker. (Cherry Sprigns Star Party)
Setting Up and Polar Alignment
When you’ve chosen the perfect spot to set up, with a clear view of your subject’s direction, you can start preparing your camera and lens for action.
By FAR, the most important step is your polar alignment.
A star tracker is a paperweight if it isn’t properly polar aligned. Thankfully, it’s super easy to do, and there are free apps that show you exactly how to adjust the mount.
- Find Polaris: You’ll use the North Star, Polaris, as a reference point. Use a stargazing app like Stellarium to locate Polaris in the night sky.
- Adjust the Mount: Set your tripod to your local latitude angle using the built-in scale on the star tracker’s mount. Use the altitude and azimuth adjustment knobs to center Polaris in the polar scope or alignment reticle.
- Fine-tune: Look through the polar scope or use an app that shows where Polaris should be on the reticle circle for your time and date. Adjust the mount until Polaris sits in the correct position on the circle, which is not necessarily dead center.
Remember — this has nothing to do with the tripod position or where the camera is pointed. It’s JUST the angle of the tracker. If you move the tracker to a new spot, you need to polar align again! So pick a spot and leave it there!
Pro-tip: Be sure to do this at dusk, when the North Star is visible but you can still see what you’re doing. If you’re under dark skies and you wait to do this, Polaris can be difficult to find when there are so many other stars.

I use the ‘PolarFinder’ polar alignment app on my phone to guide my adjustments.
Attaching Your Camera and Lens
Next, you will attach your camera and lens/telescope to the star tracker. I like to use the ball-head adapter on the Star Adventurer. This is the little green accessory that comes with the Star Adventurer ‘Pro’ package.

The ball-head adapter I use on the Star Adventurer.
If you’re using a mirrorless or DSLR camera, an affordable prime lens can be an excellent choice for getting started. For example, a lens with a 135mm focal length captures a wider section of the night sky and is ideal for larger deep space objects.
You might be surprised at how enormous some of these targets are—some nebulae span more than a dozen times the apparent width of the Moon. While many smaller deep sky objects do require a telescope, a camera and lens combo is perfect for capturing the bigger and brighter ones.
A wider lens, like a 24mm, is especially good for Milky Way core shots and wide-field compositions of constellations. While this lens has an impressive maximum aperture of F/2, you may want to stop down to a less agressive setting of F/3.2 for better star quality.

The Rokinon 135mm F/2 Lens (Canon).

The Rokinon 135mm F/2 lens is great fro large nebula regions like the North America Nebula.
Final Setup and Balance
After your tripod and star tracker are in place and your camera is mounted, the next step is to balance your setup. For most camera and lens combinations, especially lighter ones, balance won’t be a major concern, but it’s still worth checking.
Once your gear is positioned, try unlocking the tracker’s clutch to see how the setup behaves. The system is out of balance if the camera tilts or swings to one side.
While some compact trackers can handle minor imbalances, achieving proper balance is still good practice, especially if you plan to shoot longer exposures or use a heavier lens or telescope.
If you’re using more substantial gear, your tracker may include a counterweight bar, which can be added to help distribute the load evenly. This becomes especially important when you’re working with higher magnification, as even small shifts can impact your tracking accuracy and image sharpness.
![]()
![]()
Using the star tracker’s counterweight on a heavier load. (Askar SQA55).
Pointing and Tracking
When you’re ready to aim your camera at your target in the night sky, release the tracker’s clutch by turning a black ring. Once you’ve found the right angle and framing, tighten the clutch just enough to secure it in place.
Avoid over-tightening, as this can put unnecessary strain on the mechanism. Be sure NOT to move your mount and tripod during this process.
Once locked in, the tracker will begin moving at the same speed the stars appear to move across the sky. The motion is so gradual that it’s nearly imperceptible, but it’s crucial for capturing long-exposure images without star trails.
![]()
![]()
Using a ball head on your star tracker gives you more flexibility in framing your target
Many star trackers feature a dial with different tracking rates. For deep-sky astrophotography, choose the ‘sidereal rate’ mode, often marked with a star icon. This rate matches the rotation of the Earth and keeps your target steady in the frame.
When your tracker is running, avoid touching or disturbing the setup. Even small bumps or vibrations—from footsteps, wind, or adjusting other gear—can affect your final image. Once everything is aligned and tracking, let the tracker do its job quietly and smoothly.
Camera Settings
When setting up your camera for astrophotography, start with some reliable low-light photography settings that consistently work well for capturing the night sky.
Set the aperture of your lens to around F/3.2. Even if your lens opens wider (such as F/2), stopping down slightly often produces sharper, tighter stars. It may take some experimenting to find your lens’s sweet spot, but generally, a faster f-ratio will let in more light.
The Rokinon 135mm F/2 lens is highly recommended for those just getting into deep-sky photography. Its 135mm focal length is just deep enough to reveal many of the brighter, larger nebulae.
While this lens may not resolve smaller galaxies well, it’s excellent for targets like the Andromeda Galaxy and the Triangulum Galaxy, which show up beautifully with this setup.
In the image preview below, you can see the excellent star quality produced by this camera and lens combo. This is a 90-second exposure at ISO 1600, which confirms the accurate polar alignment and precise tracking of my setup.
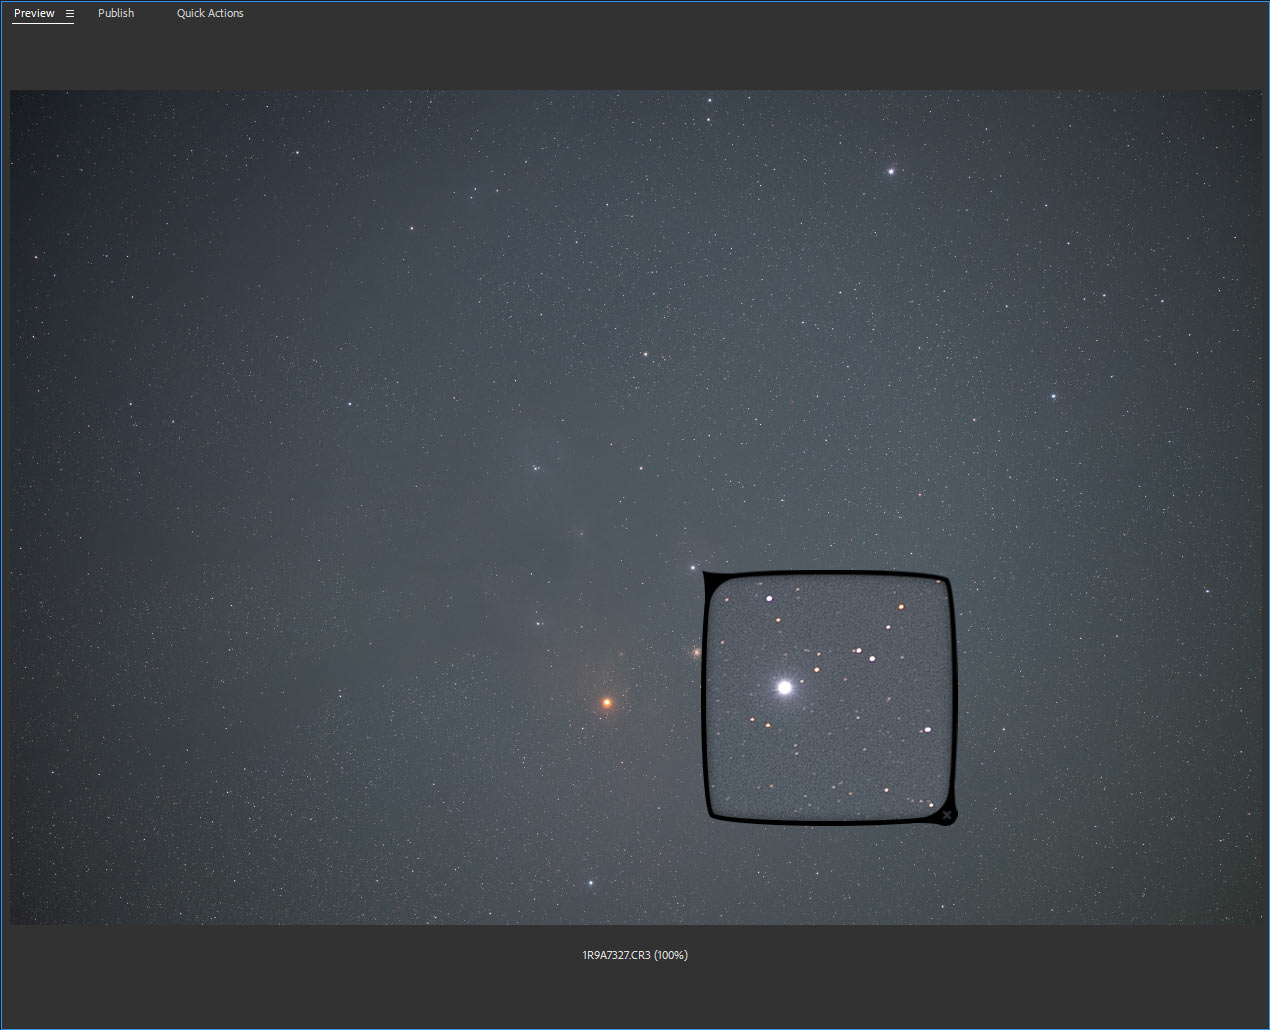
The stars are nice and round in my tracked, 90-second sub exposures.
Shooting and Exposure
Astrophotography images should be captured in RAW format to collect the maximum amount of detail. It also allows you more flexibility during post-processing.
Be sure to set your camera to MANUAL mode, which gives you full control over every setting, including ISO, shutter speed, and aperture.
ISO 1600 typically works well for deep space photos, while ISO 3200 is often better suited for Milky Way shots. Individual images may look a little noisy, but this can be significantly reduced by stacking multiple exposures during editing.

One of the most common questions is about the ideal exposure length. While this depends on your subject and gear, an exposure time of around 90 seconds is often a great place to start when capturing deep sky objects.
It’s long enough to gather significant light—especially when shooting at f/3.2—yet still manageable for most lightweight star trackers.
Always check your histogram after each exposure to ensure your settings are on point. If the data is pushed too far left (shadows) or right (highlights), tweak your exposure accordingly.

Check the histogram to ensure the data is not being clipped.
To actually take the shots, use a simple remote shutter release cable—inexpensive options are widely available online. Just plug it into your camera, and set it to capture a sequence of exposures with a brief delay between each one to minimize vibrations.
Ensure your camera is in BULB mode, which allows you to shoot beyond the standard 30-second limit—a must for deep space astrophotography.
Finding and Framing the Target
Many beginners get stuck trying to find a target, and it’s completely understandable. If you’re starting out and haven’t learned the night sky yet, locating deep sky objects can feel like a mystery.
Thankfully, planetarium apps make this process much easier. With tools like Stellarium, you can get familiar with the brightest stars and constellations quickly. The AR feature in particular helps orient yourself under the stars and zero in on potential targets.

Use a planetarium app like Stellarium to help locate your target.
To locate a deep sky object, start by identifying a bright nearby star. For example, a star like Antares can serve as a useful anchor point when searching for surrounding nebulae or clusters. When a bright star is available near your target, use it—it makes things much easier.
That same star can also help with focusing your lens, ensuring the entire frame is sharp. For dimmer objects, expect to take a few test exposures to see what’s actually in the field of view. Live view on most cameras only shows the brighter stars, but even a 15-second exposure can start to reveal fainter details like nebulosity.
Take a few test shots, make small adjustments, and repeat until the framing looks right. Once everything lines up, stick with it and start capturing your full sequence.

Single Image Frame. 90-second Exposure at ISO 1600.
As I am using a full-frame camera, the field of view is the true focal length of 135mm. This captured an extremely large area of the sky.
Collecting the Final Data
You’re ready to start imaging once you’re polar aligned and pointed at your target. If your subject is low on the horizon, don’t worry—your images will gradually improve as it rises higher in the sky. Just give it time.
Be sure to check your setup every 30 minutes or so. This helps confirm that tracking is still smooth and that your focus hasn’t shifted. If the temperature drops overnight, which is very common, it’s a good idea to refocus, as cooling equipment can cause a shift.
If all goes well, you’ll collect a few hours of total exposure time, which gives you plenty of good data to process later on your computer. With practice, this process becomes second nature. It’s a great way to spend a summer night under the stars—and once you get the hang of it, it’s incredibly rewarding.

I took 50 x 90-second exposures in total.

The Rho Ophiuchi Cloud Complex captured using a DSLR and a Lens on a star tracker.
Additional Star Tracker Tips and Tricks
While I have gone over the importance of polar alignment, balance, and camera settings, I wanted to share a few insightful tips from years of using my star tracker for astrophotography.
- Ensure your tripod is level and not slowly sinking into the soft ground throughout the night.
- Hang additional weight from a bag underneath your tripod (a water jug with a handle works great).
- Keep Exposure Lengths from 60 to 120 seconds to limit tracking errors.
- Dither your images by shifting the image frames slightly every once in a while.
- An ISO setting of 800 to 3200 is often the ‘sweet spot’ for astrophotography projects.
- Use a prime lens (fixed focal length) over a zoom lens when possible.
- Stop your lens down a notch or two (eg, from F/2.8 to F/3.2) if the star quality is poor.
- If your stars are elongated, this indicates poor tracking. Double-check your polar alignment.

Conclusion
Setting up a star tracker for astrophotography might seem intimidating at first, but once you’ve done it a few times, it becomes second nature. Before long, you’ll be polar aligned and locked onto your target in minutes, ready to start collecting amazing data under the stars.
One of the best things about using a smaller star tracker setup is how fun and freeing it is. Everything is lightweight, portable, and battery-powered, which opens up endless possibilities for shooting locations.
With just a camera and lens, you have a surprising range of target options—from wide-field Milky Way shots to large, glowing nebulae. You can play with composition, experiment with focal lengths, and frame your subject exactly as you want.
This kind of setup reminds you that astrophotography doesn’t have to be complicated or expensive to be rewarding. With a simple tracker and a little practice, you’ll capture amazing deep space photos for yourself. Have fun!

Trevor Jones is an astrophotographer and a valued member of the RASC. His passion is inspiring others to start their astrophotography journey on YouTube so they can appreciate the night sky as much as he does. His images have been featured in astronomy books & online publications, including the NASA Astronomy Picture of the Day (APOD).
Related Content: